Patchbays are vital hubs of connectivity in any studio that has multiple pieces of outboard gear. They make it so you don't have to crawl behind your rack every time you want to change signal routing—you can do it easily from the patchbay.
Connecting up a patchbay for a session is the focus of this excerpt from "Start to Finish: Jacquire King - Episode 1 - Room Setup And Micing" But before getting into what Jacquire has to say, let's first go over some patchbay basics.

Configuring the patchbay in the control room before the session.
Patching it Up
Think of a patchbay as the central hub for all your studio connections. With your outboard gear's inputs and outputs connected to a patchbay (or patchbays, depending on how much equipment you have), you accomplish two important things: You create a default routing setup, and you have all the inputs and outputs of your gear available on the patchbay so that you can reroute conveniently, when needed, using patch cables.
Patchbays come in many formats, 1/4" unbalanced, 1/4" TRS, XLR balanced, TT (the type used at Flux and most pro studios) and more. A standard type of patchbay is one rack unit in height and has two rows of jacks on the front and back. Many studios, such as Flux, have multiple patchbays stacked together in a rack on or near the mixing console.
Is that Normal?
On a patchbay, the signal you plug into a jack on the back appears on the corresponding front jack. It's important to know that the standard way to organize a patchbay is to use the top row exclusively for outputs, that is, signals coming from outputs on your gear. And you use the bottom row for signals going to inputs.
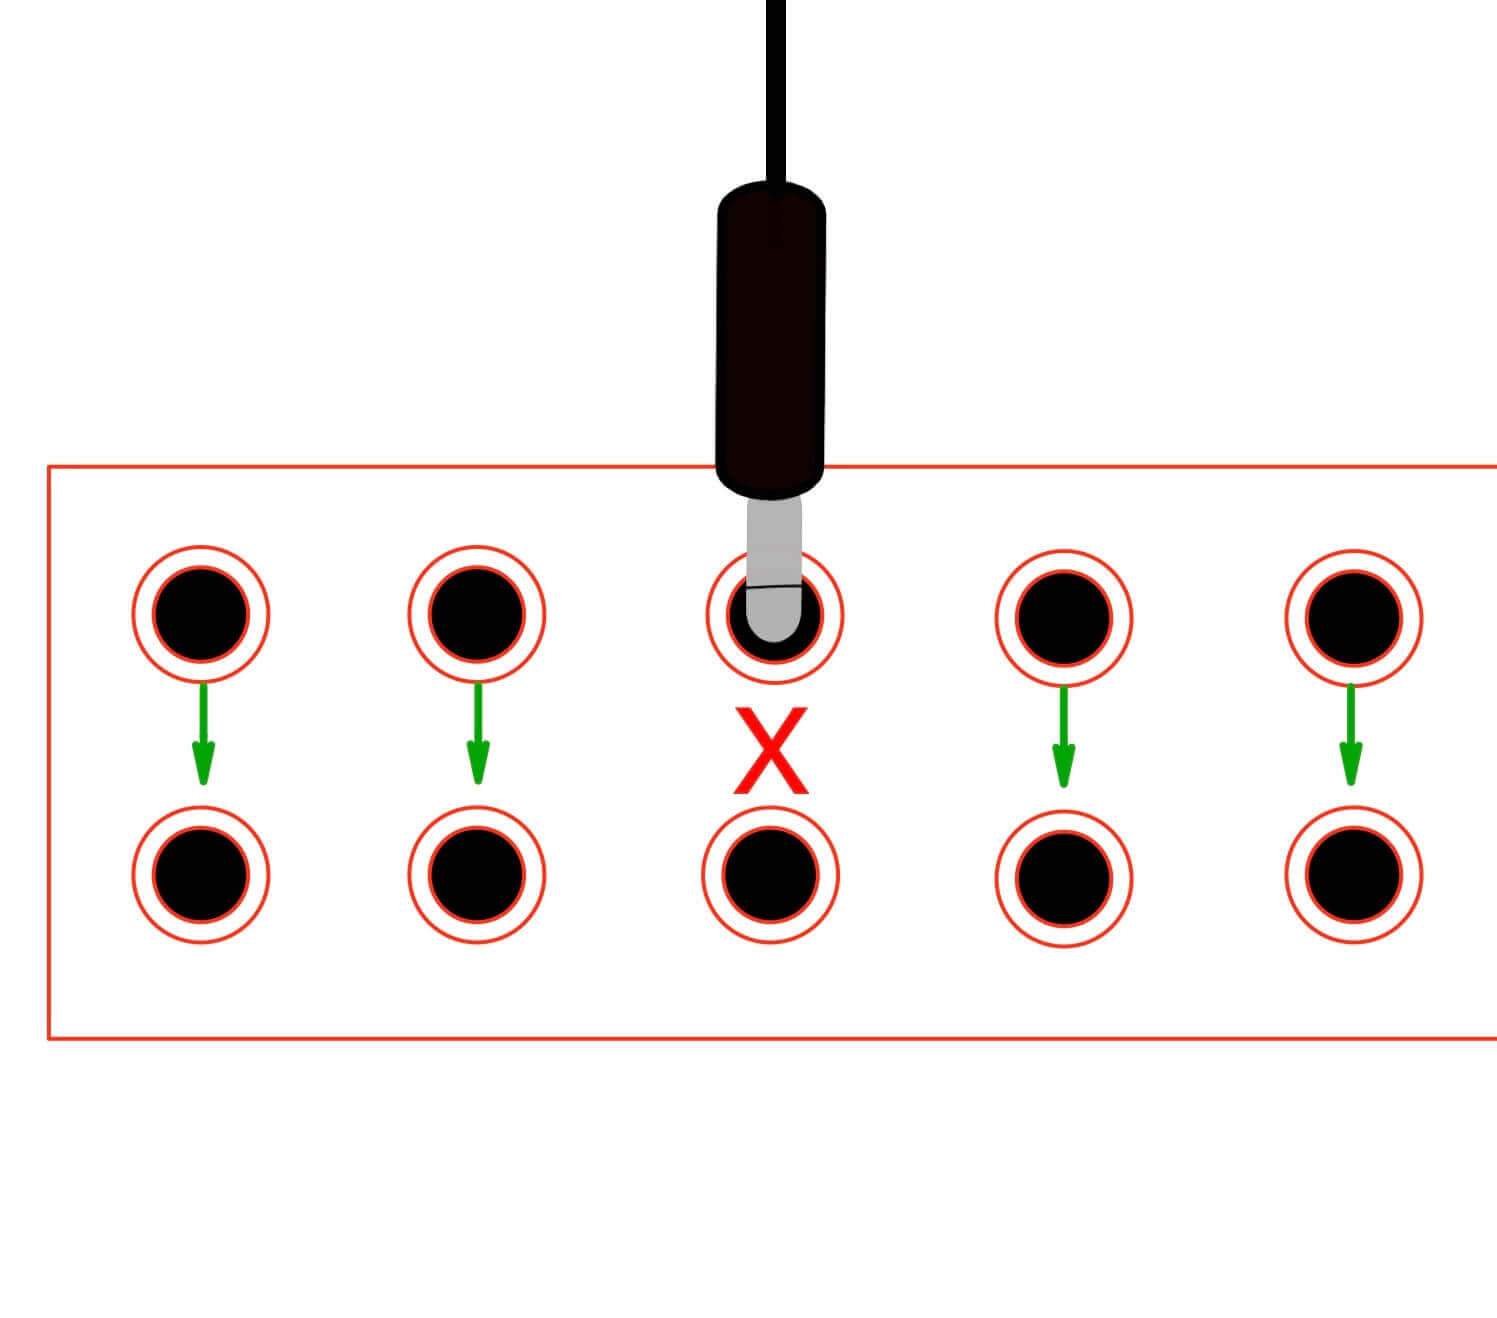
That structure also fits with two of the three patchbay signal flow modes, “normalled" and "half-normalled," With both, the signal coming into the top rear jacks flows to the bottom rear jacks by default. On a normalled patchbay, the top-to-bottom connection is only broken when you plug a patch cable into one of the front jacks for that channel.

A normalled patchbay. Signal goes from top row to bottom for each channel unless a jack is plugged in.
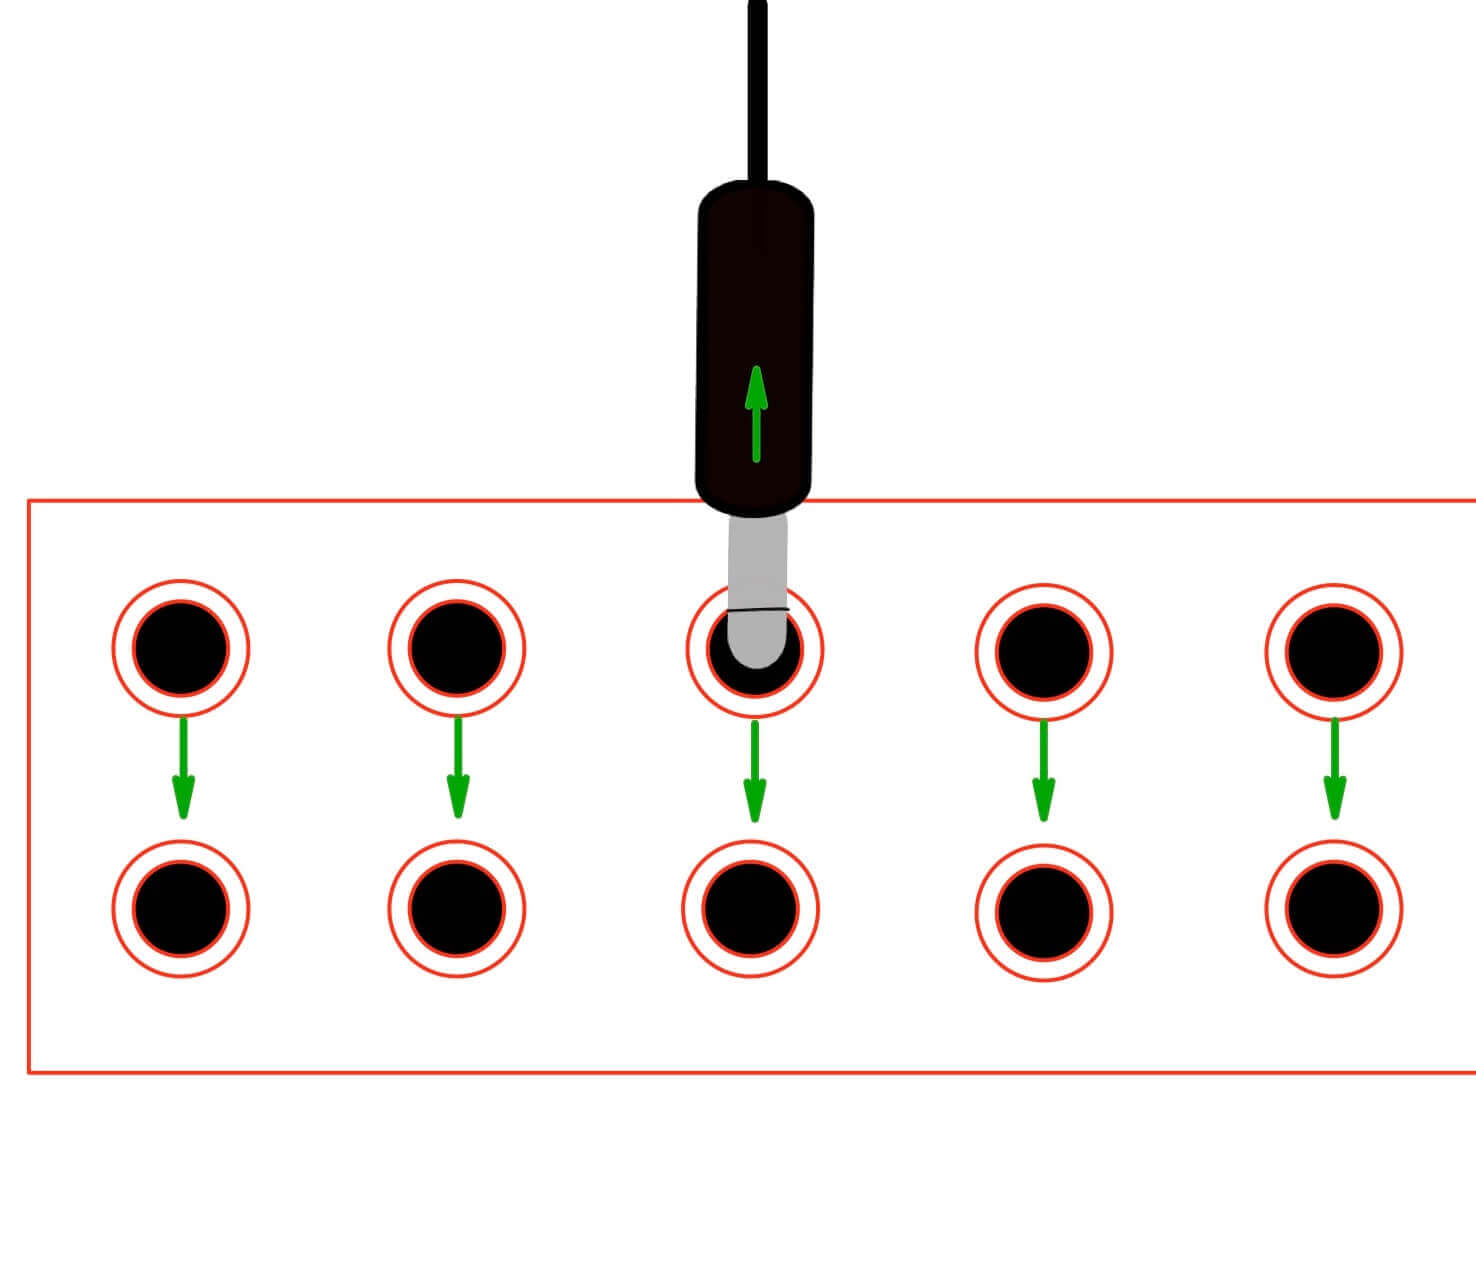
A "half-normalled" patchbay is the same except that if you connect a patch cable to the top front row, it doesn't break the connection. Instead, it mults (duplicates) the signal allowing you to send the signal to a second destination simultaneously. If you connect a patch cable to the bottom front jack, though, it will break the connection.

A half-normalled patchbay mults the signal from the top row.
The other patchbay mode is called "thru." With a thru patchbay, each patch point is independent. Signal doesn’t pass from the top to the bottom. Many patchbays are switchable between the three modes.
Hooking Up
Here's a simple example of how you'd use a normalled patchbay to connect an 8-channel outboard mic preamp unit to an 8-channel audio interface via a patch bay. The reason why you'd do it is to give yourself the flexibility to insert other hardware (say compressors or EQs) into the signal path for each channel, and you'd be able to crosspatch the outputs of the mic pres into different inputs if you wanted.
You'd start by plugging mic pre-line outputs 1 through 8 into the first eight channels of the top rear row of the patchbay. (For simplicity's sake, we're starting on channel 1 of the patchbay, although you could start on another channel as long as you connected the subsequent ones in next).
You'd then connect the corresponding bottom rear eight jacks on the patchbay to the audio interface's eight line inputs. That way, the signal would flow out of the mic pre into the patchbay's top row and automatically go to the bottom row and through the cables into the interface.

The signal flow from the patching example just described.
Back to the Action
Now, let’s get back to the excerpt, which starts with Jacquire in the control room of Flux Studios in New York City, with assistant engineers Tom Beuchel and Kolton Lee. They're discussing which channels on the Neve console to patch the mics and DIs for the tracking session with the band Oak and Ash.
Tom says he's going to plug-in the drum mics so that they'll stay in their normalled routing to the console and into Pro Tools. Initially, he had connected them in a different configuration but says he'll change it back.
Jacquire checks with Tom to make sure there's no phantom power on for any of the channels. That's because you don't want to plug and unplug cables or mics when phantom is on because it can potentially cause damage to the mics and speakers.
Tom tells Jacquire what the order of inputs will be. The bass will come in on channels 1 and 2. Channel 1 is a DI and Channel 2 is a mic’ed bass amp in an isolation room.
The drum mics will come into Neve channels 3 through 12. After that are three channels for guitar. Those consist of a DI and then two mics on the amp: a Shure SM57 and an AKG C-414. You see Tom patching everything in on the studio's large, TT patchbay setup.
Going Out for EQ
Jacquire explains that he's decided to route the kick and snare channels through an outboard GML 9500 EQ. He's using the GML in addition to the Neve EQs because it's got many more frequency points (settings).
He says he'll mainly use the GML to sculpt the midrange, and do the more general equalization—"bigger and bolder" as he puts it—using the Neve.

Jacquire uses the GML 9500 EQ on the kick and snare.
Adaptor DI
Jacquire explains why he is using a DI in addition to the amp mics for the guitar. Most importantly, it gives him the option of reamping it or using an amp simulator plug-in during the mix should he decide to change the sound.
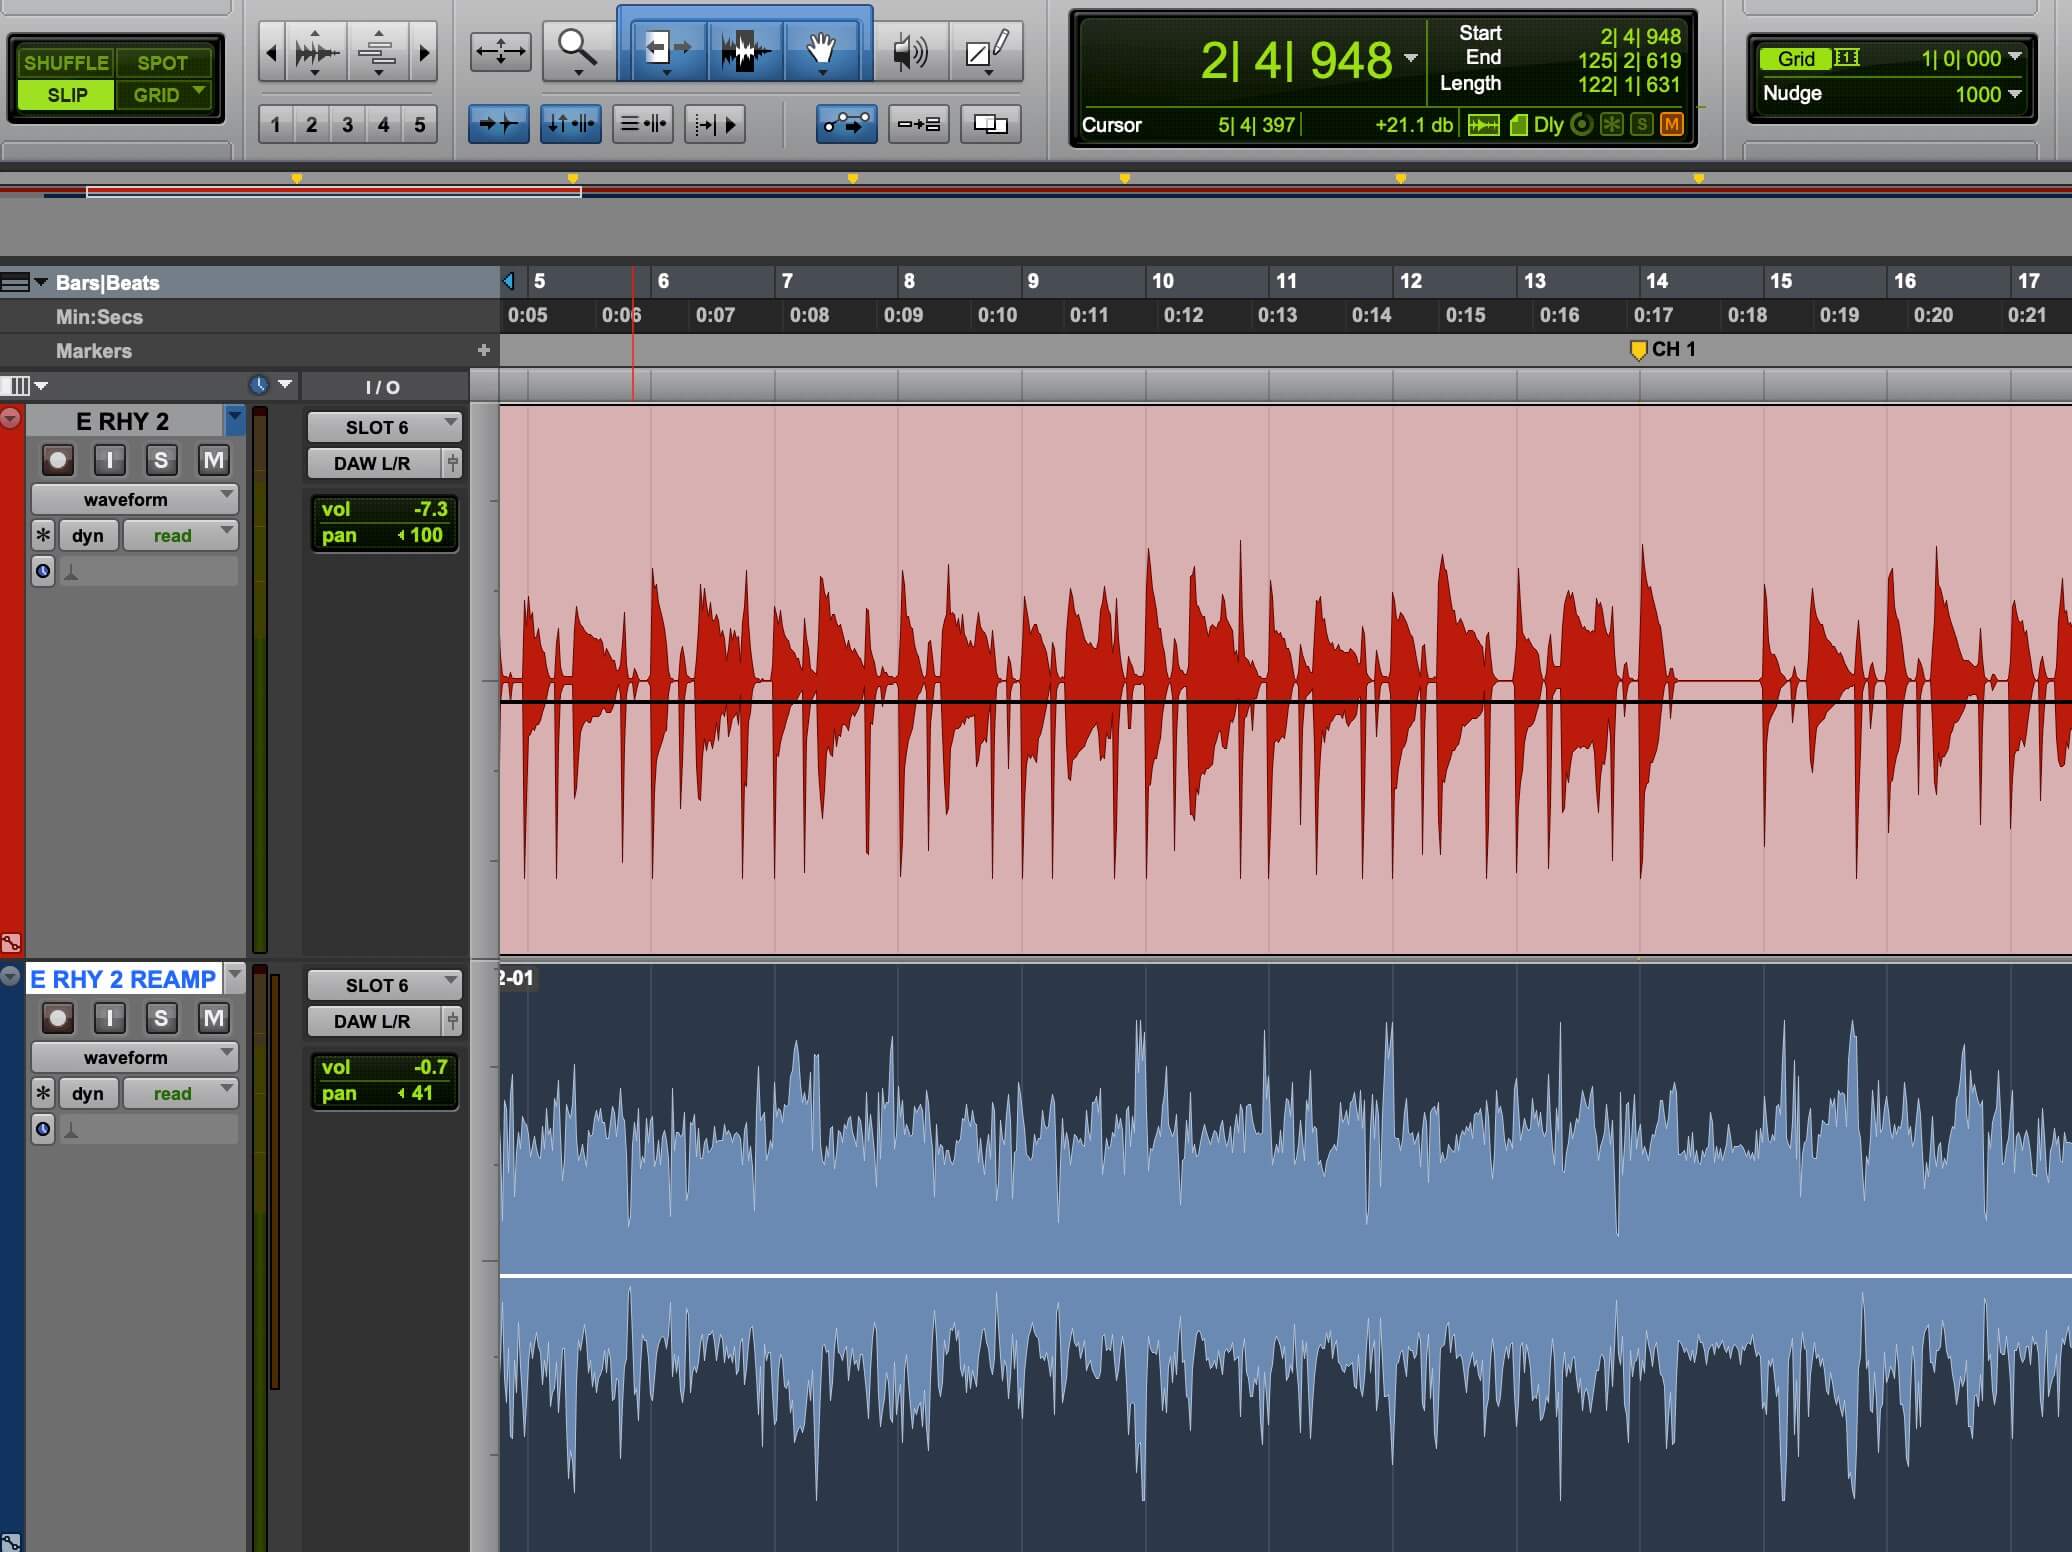
Also, it’s helpful to see the clean DI waveform because those from distorted guitars—which are much denser due to the compression, sustain, and noise created by distortion—are sometimes harder to see details in when editing. So, he sometimes uses the DI guitar track strictly as a visual aid.

Here’s an example of a DI guitar track before (above) and after (below) it was distorted.
In addition to the Neve EQs, Jacquire is also sending the guitar signals into outboard Chandler channel strips for additional equalization. The two mic’ed signals will eventually be combined and sent to a new channel in the desk.
Jacquire mentions that he doesn't usually compress distorted guitar amp signals. He says you don't need compression if you place the mics well. He generally only compresses clean and dynamic electric parts.
Lightly Squeezed
Speaking of compression, Jacquire says he’s going to send the vocal through an LA-2A on input but will only need to compress it lightly. Rich, the lead singer, has a voice that Jacquire describes as being "naturally compressed by the volume of his body."
At the end of the excerpt, he discusses the talkback mic setup for the tracking session with Tom. They're discussing whether to use individual talkback mics in the live room for each musician or to use one omni mic in the middle of the room that all the band members—who are all recording together—can be heard from.
They end up deciding to use the single omni. In the studio, when a simple setup can give you equivalent results to a more complex one, it's usually best to go with it.